Custom 3D Printer

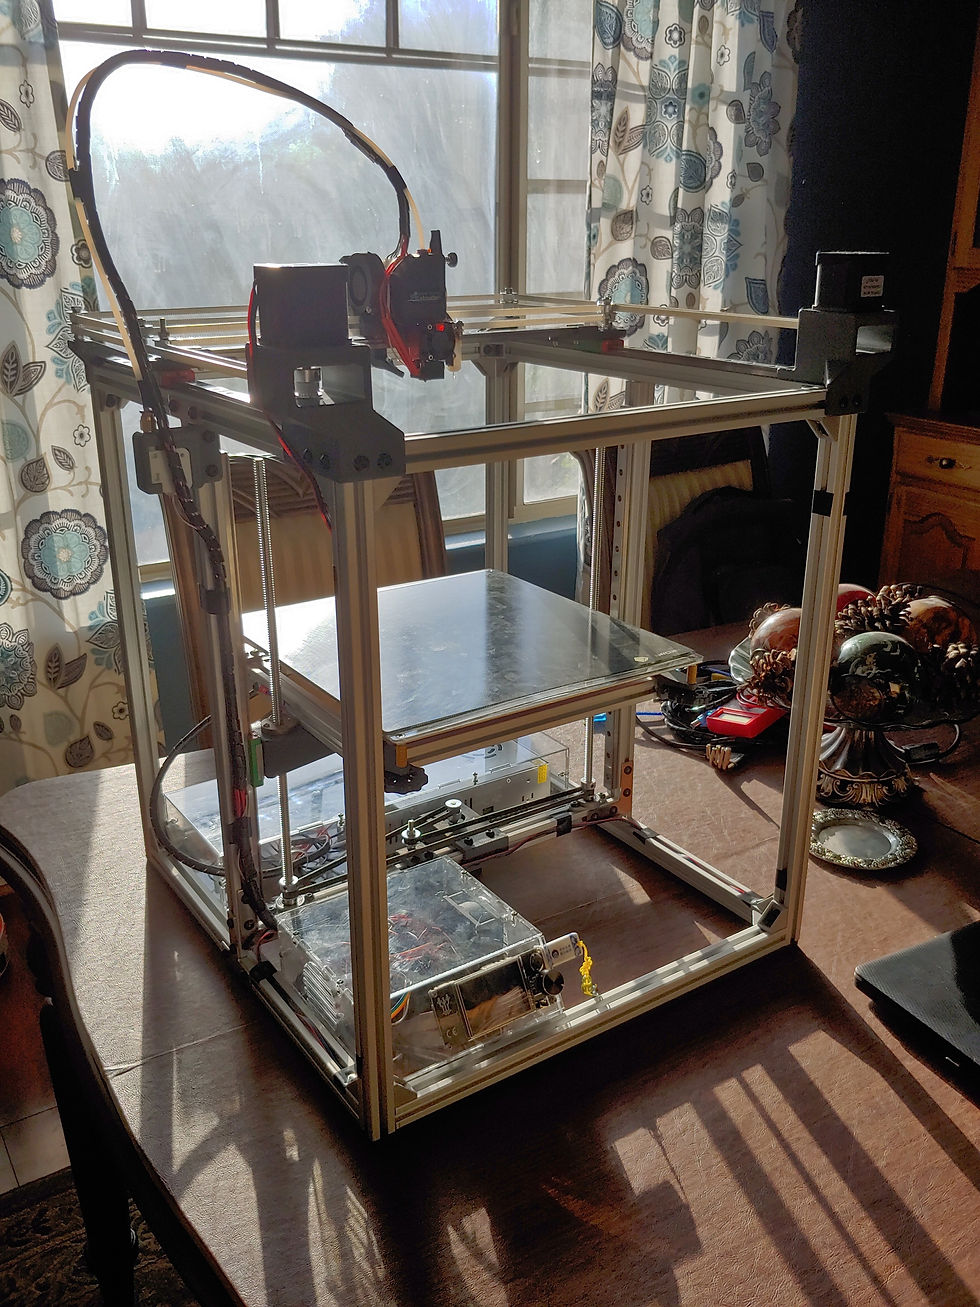
The final product (so far!)

A test print that I'm particularly proud of
Meet Mobius
December 2019 - June 2020
In January of 2019, I started working at the FSE 3D Print and Laser Cutter Lab at ASU. Up until this point I had little more than a passing interest in additive manufacturing, but since starting this position I became entranced with the technology. Even though I had free access to our lab's printers (a pretty great work perk considering its a student job!), my use was limited by the sheer number of class-related student submissions that take priority over personal projects. I decided to buy a 3D printer myself, but after spending a couple months browsing the consumer market and doing extensive research on the most popular models, nothing I found had everything I wanted unless I was willing to pay a few thousand dollars. When considering the more budget-minded machines, however, I found myself compiling a list of community upgrades to apply (side note: the RepRap movement has inspired a massive community of makers who have freely published hundreds of printer modifications that use the printer itself. This is amazing and inspiring to me!)
During my search, I came across a custom build by Australian Youtuber Tech2C called the Hypercube. This machine boasts a great performance-to-cost ratio, and it had detailed build instructions and a large support community. Inspired, I began to consider designing my own printer. It would allow to me include all of the features I wanted at an affordable $550 (after applying some vendor coupons), I would be able to fix anything that could possibly break on the machine, and it would have nearly unlimited upgrade potential. The fact that I would learn a lot about mechanical design, 3D modeling, G-code, and printer firmware was also very appealing. I was sold on the idea, and in December of 2019, I began the long process of compiling a list of parts and mocking up an assembly in Solidworks. Over the course of the next six months, much of my spare time was dedicated to working on this project.
By June 2020, I had finished most of my calibration and the printer was fully up and running. Although I will likely continue to fine tune it far into the future, it has gotten to the point where it is more of a tool for other projects than a project itself. A couple of the other projects on this site were made possible by this machine. The project is inspired by the Hypercube, and its frame design is similar, but the kinematic components more closely resemble the Seckit SK-GO. The printer (hesitantly named "Mobius" for now, though that may change) has a 310x310x330mm build volume, a direct drive extruder / hotend assembly, an AC-heated bed that heats up faster then the hotend, sensorless homing, an auto-bed-leveling sensor, and a filament runout sensor. For the XY gantry, it employs a CoreXY kinematic system to minimize the moving mass and allow the XY motors to work together for a majority of travel moves. More details on the CoreXY system can be found here. Due to its tool steel nozzle and all-metal hotend, it is capable of processing regular consumer printing materials such as PLA, ABS, and PETG, but also more engineering-oriented materials like nylon, carbon-fiber-infused nylon, and polycarbonate blends. A full bill of materials for the project is available here.
My design is fully modeled in a Solidworks assembly of over 200 parts. A large number of components, such as the hotend, extruder, motors, and electronics, already had existing models on GrabCAD, which I was very thankful for. The complete assembly is embedded below as an interactive model (note that it may take up to 4 minutes to load into the page as it is a large file). All of my completely custom parts are embedded further down the page in a sliding gallery along with further details about the design of each piece.
The gallery below contains most of the custom parts I designed and 3D printed for this project (yes, the old joke is true, you really do need a 3D printer to make a 3D printer!). The slideshow does not include some simple parts I designed for cable management, nor does it contain the custom acrylic laser-cut electronics enclosures, although these designs are visible in the full assembly above. Also missing from the gallery is the custom bed plate, which is essentially a rectangle with holes in the corners for the leveling / mounting screws, and the notched bed aligners, which help index the glass build platform on said bed plate. I machined both of these components out of aluminum sheet, and they are visible under and around the black glass bed in the assembly above.

This bracket is 3D printed out of ABS and connects all of the main kinematic components for the z-axis: it has mounting holes for the z linear bearing block, the lead screw nut, and the aluminum extrusion that makes up the lower frame of the print bed. There are 2 such brackets, one on each side of the bed assembly The 2 "nubs" on the back were added in the second version of this part in order to better affix the bracket to the bearing block and prevent rotation. The printer manufactured this revised version for itself out of PLA to improve the stiffness of the bed assembly. This is a great example of Mobius making its own replacement parts!
I have some exciting updates planned for this project, and I will continue to update this page as they are implemented. The most interesting upgrade involves adding tool-changing capabilities so the printer can use multiple colors or materials in a single print. This will allow me to use dissolvable support materials which will allow almost any geometry to be printed. There are also some fun implications when mixing flexible materials with rigid ones (fully printed single-piece wheels, integrated part grips, etc). More details will be announced as the project progresses.